The kid in the house has been learning music the past several years. Starting with the recorder and trumpet in elementary school, he now is learning piano and the ukulele. The other day, he asked me to get him a music stand. I did some research and learned that music stands generally have the following components:
- Tripod-like base
- Adjustable Column for raising the stand up and down
- Desk tray with lip for holding the music book or sheets
- Mounting bracket for attaching the tray to the stand
- Adjustment knobs and clamps for adjusting the tilt of the tray
Let’s go over each of these items and see what I used to MacGyver my own music stand out of parts I already had in my house.
Base with adjustable column
I don’t do much photography these days, but I have a lot of gear, including light stands. One of the reasons I didn’t want to buy a music stand from, say, Amazon was that they all came with a light stand, and I certainly don’t need any more in the house.

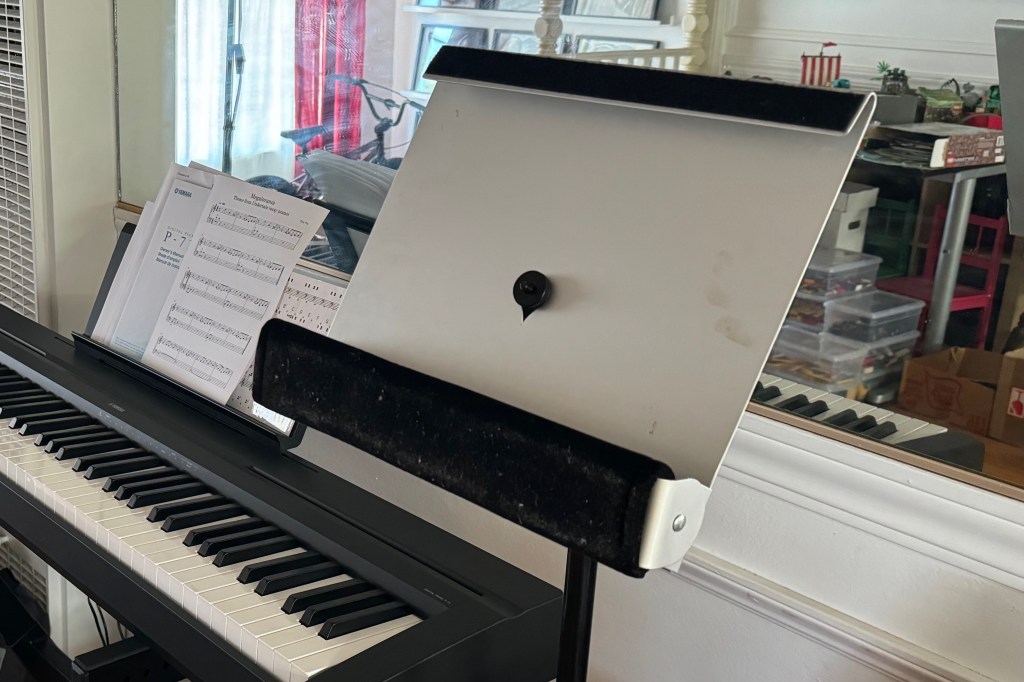
Desk tray with lip
The tray in music stands is typically made of metal or plastic. On the back there is typically some kind of slot in which the mounting bracket slides into. The mounting bracket then attaches to the stand and allows the tray to tilt up and down.

I have had this Rain Design iLap aluminum laptop stand for what seems like decades now. Modern laptops are relatively cool now, and it’s been years since I last used it. As you can see in the image above, the Rain Design logo is cut out in the middle of the aluminum tray. Flip the stand upside down, and it reveals a tilting aluminum base at the back and a curved lip at the front. The tube-shaped foam padding in the front is removable because it’s velcroed on.
I realized I could cut out a piece of cardboard, bend one end to hold sheet music and slide the whole thing between the lip of the iLap.
Mounting bracket and adjustment knobs
Now I needed a way to attach the iLap to the stand. As part of my lighting gear, I have several flash umbrella bracket adapters. This would provide the tilt needed to angle the desk tray properly for my kid whether he is seated or standing.

To attach the iLap to this adapter, I had these cold shoe screw adapters. I unscrewed one of the circular plates and place it on one side of the hole in the iLap. The adapter went on the other side, and I tightened them together so the tray didn’t spin too much.
Next, I attached the flash mount plus tray combo to the swivel head and light stand.
Finally, I cut up some cardboard to the dimensions of the iLap, bent one end, taped it up, and slotted it through the back of the iLap.


Voilà, my own MacGyver-style music stand for my kid. Cue up the MacGyver theme song!
Now, I would be remiss in noting that the individual components I used to make this music stand cost more than just buying a new stand from Amazon. Don’t go out and buy an iLap for $50, an umbrella bracket for $18, a cold shoe adapter for $10, and a low-end light stand for $20. That’s $98 right there. You can buy new music stands from Amazon from $20 to $100.
The key point, however, is that I already had these components in my house. They were purchased years, even decades ago. They were gathering dust in a closet or box, destined one day for me to say, “I don’t need this anymore, so I’m going to trash, donate, or garage sale it.” I’m happy that I’ve found for them a new purpose in life!


Leave a comment