This post explains how you can sync Free/Busy events from delegated Google calendars to the Apple Calendar app in iOS and iPadOS.
The Problem
I use Apple’s Calendar app to view and manage my calendars in iCloud and Google. Generally, this works well, and all of my directly connected accounts sync fine across the Calendar on macOS, iOS, and iPadOS. There’s one set of calendars, however, that do not sync to all devices, and that’s delegated availability-only (Free/Busy) calendars from Google. This can be problematic if your work calendars can only be shared with Free/Busy information, and you are not participating in a Bring Your Own Device (BYOD) program with your company.
On macOS, this is not an issue, as you can share your work calendar with a personal Gmail account and see the busy events in the Delegates section in the Calendar app.

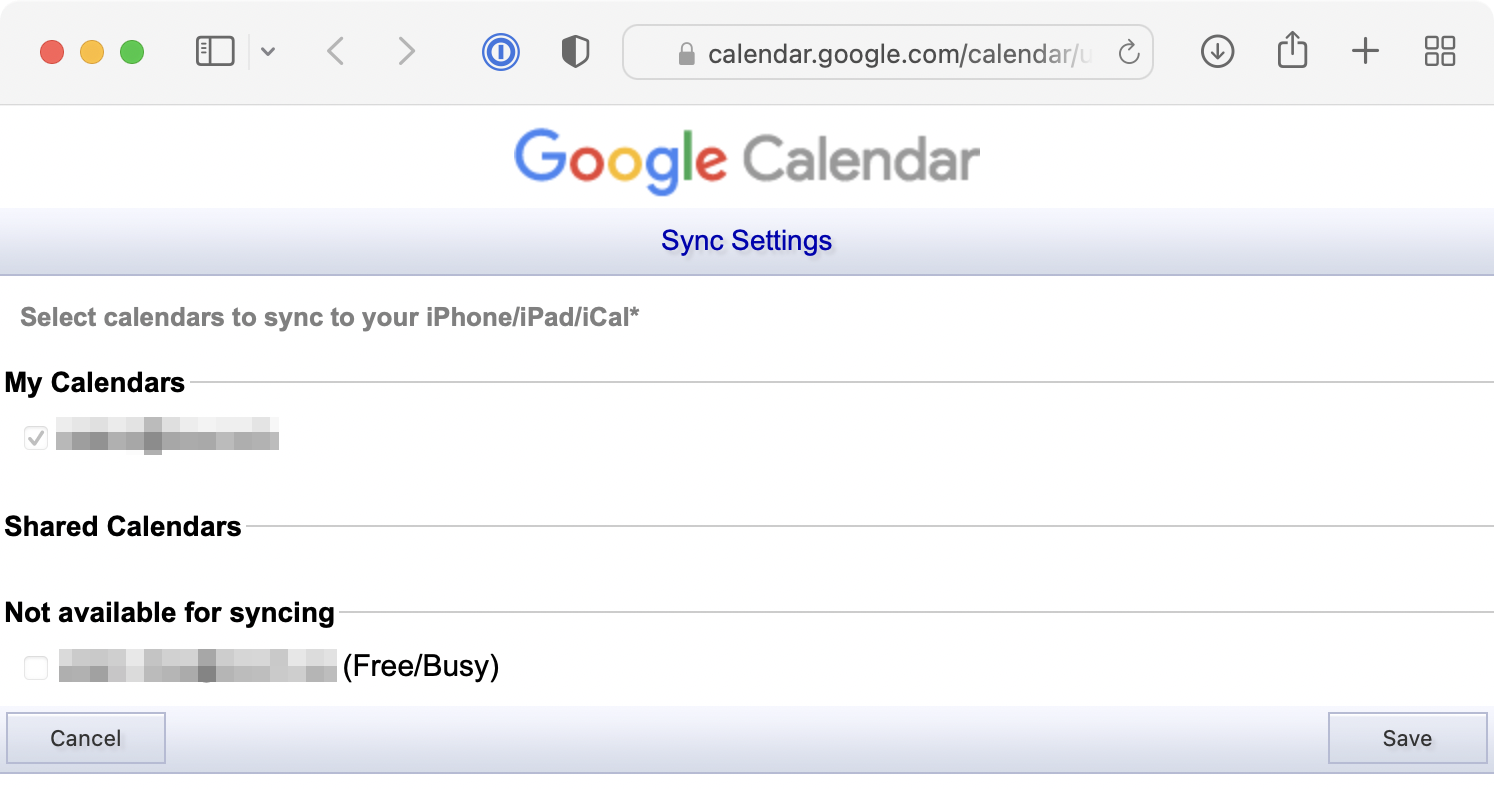
On iOS and iPadOS, however, the delegated calendar is nowhere to be found. This is because iOS and iPadOS do not support delegated Free/Busy calendars from Google. If you go to the Google Calendar Sync Settings page, you’ll see the delegated calendar under the “Not available for syncing” section.

The Solution
So, how do you get Calendar on your iPhone and iPad to see the Free/Busy calendar from work? I searched the internet far and wide for a solution to this problem, but came up with nothing. So I rolled up my sleeves and hacked together this AppleScript. The general workflow is as follows:
- Retrieve all events from the delegate calendar that are scheduled to occur today.
- For each event, check to see if there is an event with the busy title (Step 3).
- If no event exists, create a new event in the target calendar (Step 2) with the title (Step 3).
- Return the number of events changed.
Updated March 1, 2022: Added Try block to catch errors when retrieving the start or end date of events.
global delegateCalendarName
global busyCalendarName
global busyTitle

set delegateCalendarName to ""
set busyCalendarName to ""
set busyTitle to "Busy"

on GetPreferences()
	if delegateCalendarName is "" then
		error "No delegate calendar name defined."
	end if

	if busyCalendarName is "" then
		error "No target calendar name defined."
	end if

	if busyTitle is "" then
		set busyTitle to "Busy"
	else
		set busyTitle to do shell script "echo " & (quoted form of (busyTitle)) & " | xargs"
	end if

end GetPreferences

on AddBusyEventsFromDelegatedCalendar()
	set now to current date
	set today to date ("" & (month of now as string) & " " & (day of now as string) & ", " & (year of now as string) & " 00:00:00")
	set tomorrow to today + 60 * 60 * 24
	set num to 0

	tell application "Calendar"
		try
			set delegateCal to first calendar whose name is delegateCalendarName
		on error errStr number errorNumber
			error "Could not find delegate calendar."
		end try

		try
			set workCal to first calendar whose name is busyCalendarName
		on error errStr number errorNumber
			error "Could not find target calendar."
		end try

		tell delegateCal
			set calEvents to (every event whose start date is greater than or equal to today and start date is less than or equal to tomorrow)
		end tell

		repeat with e in calEvents
			try
				set startDate to start date of e
				set endDate to end date of e

				tell workCal
					set workEvents to (every event whose start date is equal to startDate and end date is equal to endDate and summary is equal to busyTitle)

					if (count of workEvents) is 0 then

						make new event with properties {start date:startDate, end date:endDate, summary:busyTitle}
						set num to num + 1

					end if
				end tell
			on error errStr number errorNumber
				log "" & errorNumber & ": " & errStr
			end try
		end repeat

		set theResult to "Number of events created: " & num
	end tell

	return theResult
end AddBusyEventsFromDelegatedCalendar

GetPreferences()

AddBusyEventsFromDelegatedCalendar()
NOTE: If you want to change the script to process events for a whole week, change the line:
set tomorrow to today + 60 * 60 * 24
to
set tomorrow to today + 60 * 60 * 60 * 24 * 7
Copy and paste the code above into the Script Editor application on macOS. Then, do the following:
- Enter the name for the delegate calendar
- Enter the name for the target calendar
- Enter the busy event title
- Save the script
Run the script and see events in your delegated work calendar be added to the target calendar for the current day.

TIP: You can hide delegated calendar in macOS Calendar so you don’t see double events at the same time.
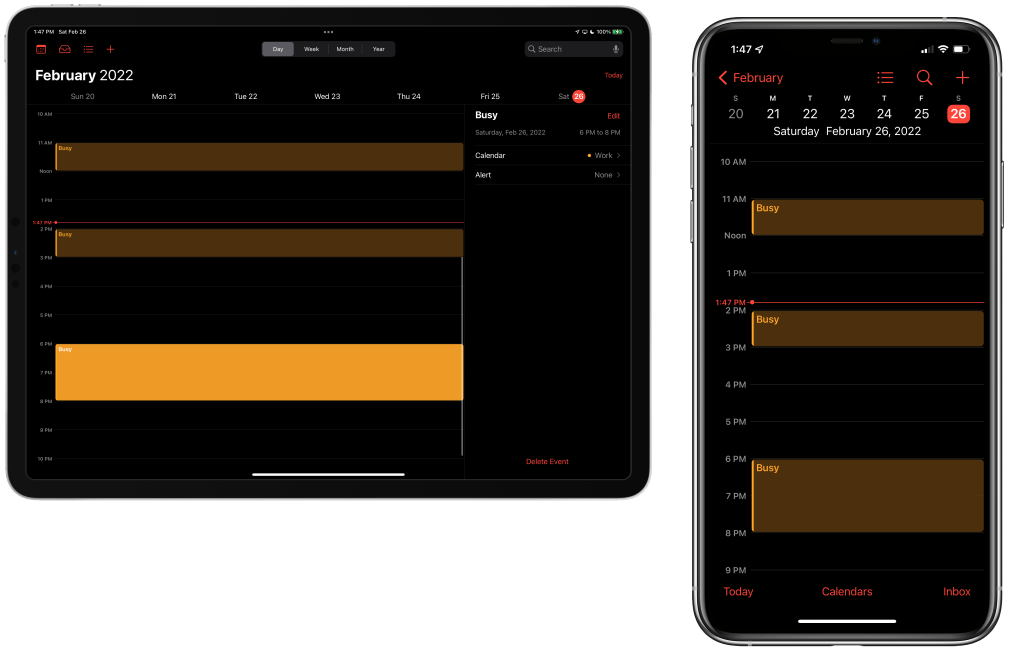
Since the target calendar exists on iOS and iPadOS, you’ll see the busy events appear. Huzzah!

Automating the Script
We will now want to automate the script so it runs periodically throughout the day. Here’s where we run into an annoying oddity with AppleScript. On macOS Monterey, we have a number of native tools to run the script:
- Script Editor
- Script Application
osascriptshell command- Shortcuts
- Automator
Additionally, there are several third party applications that can run AppleScripts:
Check out the execution time to run the script using these methods:
- Run the script from Script Editor: 4 seconds
- Run the Script Application: 16 seconds
- Run the Automator Application: 16 seconds
- Run the script using osascript from the command-line: 95 seconds
- Run the script from a shortcut: 75 seconds
- Run the Script Application from Keyboard Maestro: 18 seconds
- Run the Script Application using Fast Scripts: 18 seconds
- Run the script using Fast Scripts: Times out
Method 1: Application
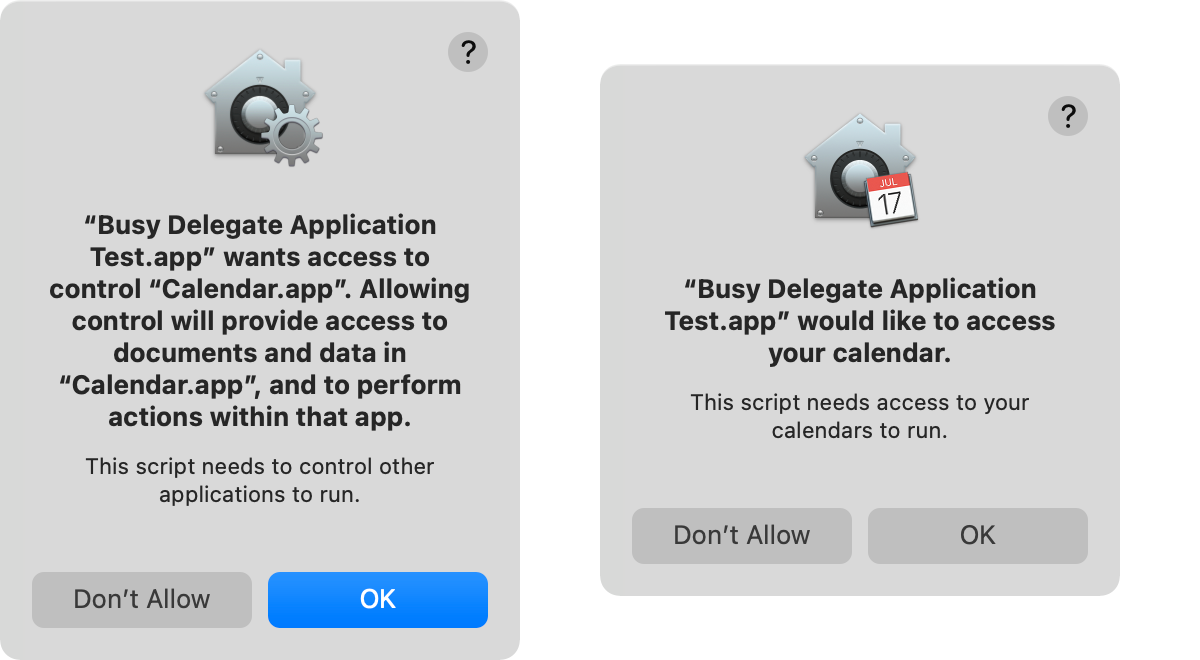
I have no idea why AppleScripts compiled into an application or run through osascript or a shortcut are so slow. We don’t want to manually open the script in Script Editor and run it every time we add a new calendar event, so we will convert it into an application and just accept the slowness. There are two ways to make an application out of a script, and while it’s easier to do it using the Export command in Script Editor, I found problems where I would constantly get infinite permission prompts to grant calendar access to the app.
To avoid this, let’s use the osacompile command line tool to create an application from a script. Suppose the script exists on the desktop with the filename BusyDelegate.scpt.
- Open Terminal
- Navigate to the directory where your script is
- Enter
osascompile -o ~/Desktop/BusyDelegate.app ~/Desktop/BusyDelegate.scpt - Press Return
The Script Application will be placed on your desktop with the filename BusyDelegate.app. Double-click it to run, and you will see it takes about 4 times as long as running the exact same script from Script Editor. While the application is running, the Calendar app will appear frozen. Once the application has completed the script, control will return to the Calendar app.
Method 2: Script
In testing, I noticed several AppleScript errors when running the application, so perhaps launching Script Editor, opening the file, and pressing Command-R to run the script is a better approach.
Setting up a Cron Job
Next, let’s add a cron Job to run the application on an interval that you choose. I ended up using Keyboard Maestro to create the job, since I’m lazy and didn’t want to muck with my crontab. This KM macro runs the application once every hour on weekdays using the schedule: 0 * * * 1-5.
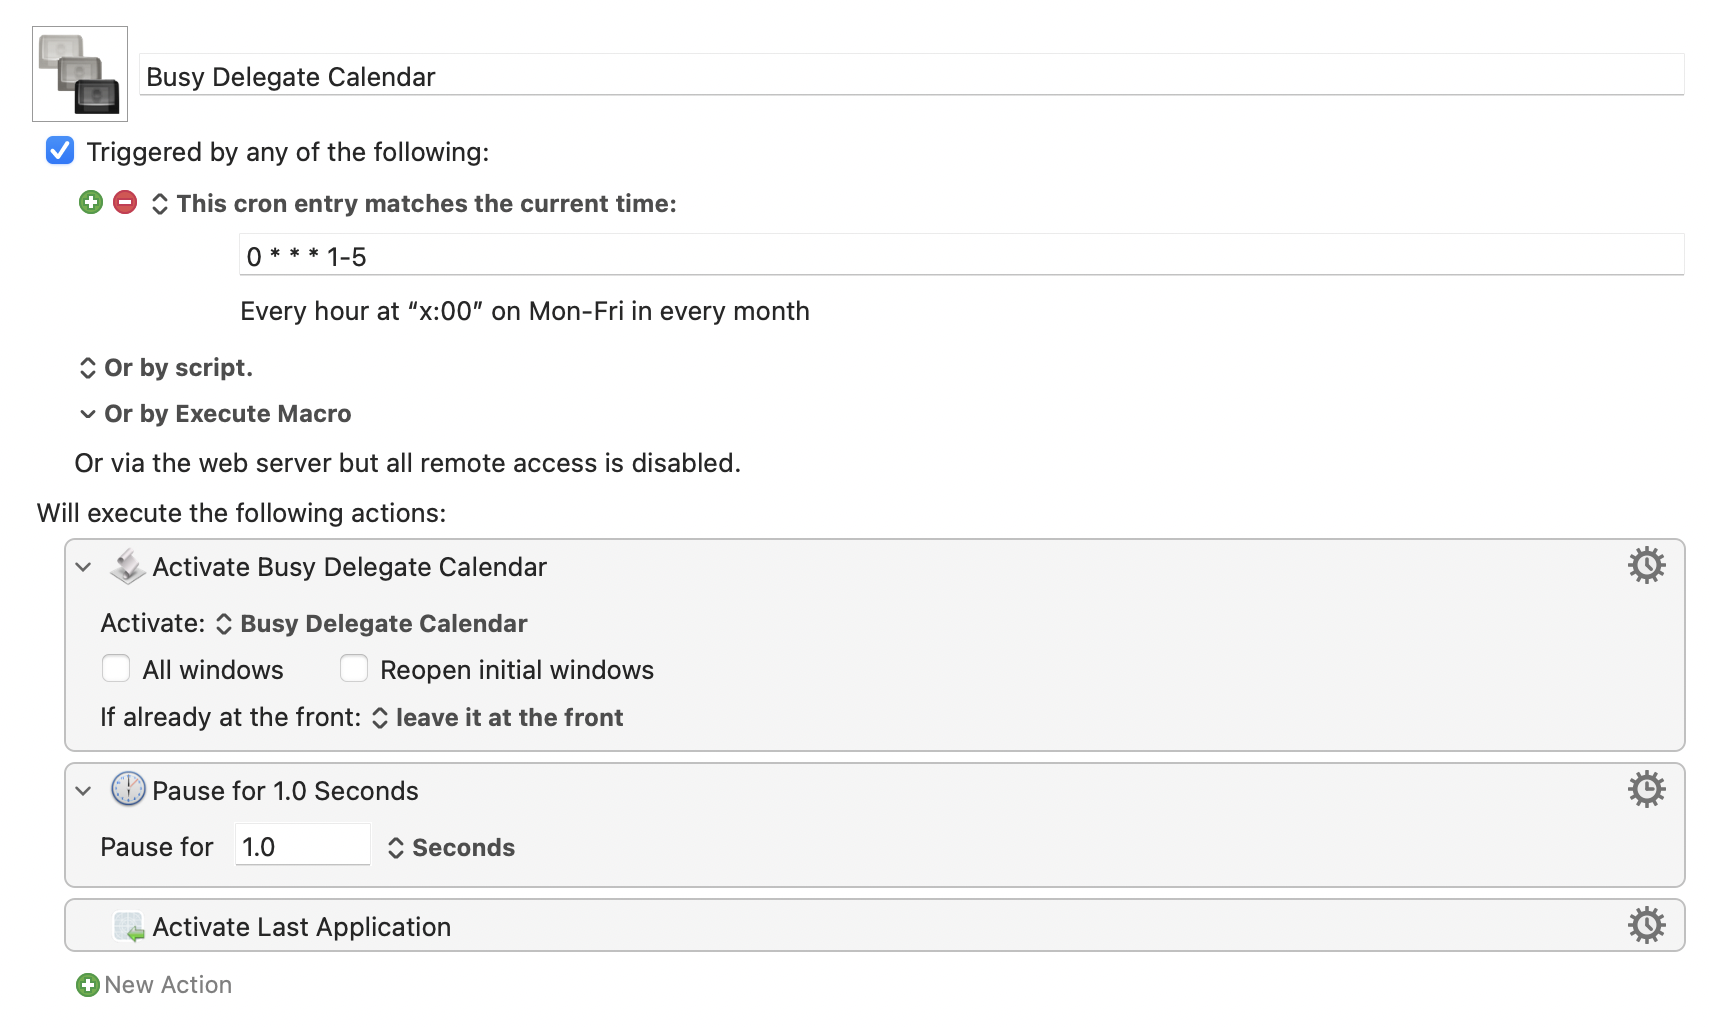
If you wanted to go with Method 2, this is the Keyboard Maestro macro you would need to create:

In both cases, the macro opens the last active application. I do this because I don’t want to lose my application focus when the script runs at the top of every hour.
Conclusion
Now I have an automated way to populate my personal calendar with Free/Busy events from my work calendar on my iPhone and iPad. It would be a whole lot better if iOS and iPadOS Calendar just supported displaying availability-only calendars from Google. Maybe it will come in iOS 16 and iPadOS 16. But if it doesn’t, at least I have a workaround. If this tutorial helped you, please leave a comment down below!


Leave a comment